Thursday, July 28, 2011

Bundle Monster Konad Nail Plate Review (21 piece set)

Squeeeeeeeeeeeeeeeeeeeeeeeeeeeeeee!

Check this out!!


Oh yeah.. pretty awesome right? I purchased the 21 piece Bundle Monster Konad image plate set from Amazon for about US$18 not too long ago cause I wanted to experiment with more Konad nail designs.

It was my first time purchasing off Amazon and it was really easy! Postage didn't cost much either, approx. US$4 and it took about a week or so to arrive.

The Bundle Monster set is a cheap knockoff of the Konad plate set. I thought they would be filmsy metal plates but they are actually as good as a genuine Konad plate!

There is a thin blue plastic film protecting each plate which is easily removed.


Each image plate has a unique number on it, just like a konad plate.


Each plate also has 6 - 7 designs, just like a Konad plate .


I have used 5 plates without encountering any problems so far but upon closer inspection of all the other plates, I did notice a slight inconsistency in one pattern. However, I'm not bothered by it because it's hardly noticeable once you stamp the design onto your nails.

This set is a partial set, which includes the BM1 - BM21 image plates.
Personally, there will be some designs of this particular set that I doubt I would ever use but I still enjoy having a variety of choices.

Now, I don't actually own a full Konad image plate set so I can't exactly compare but looking at some samples online, there will be a lot of designs I probably won't use either.

click on the photo to enlarge!
In all, I'm really satisfied with my purchase *prances*


And in anticipation of my upcoming snow trip in Falls Creek, I've created cute wintery snowflake nails.
 

Uber cute? Hell yeah! :D

Can't wait to make snow angels, snowmen and have snowball fight(s)!


// ♥

Saturday, July 16, 2011

DIY Nail dotting tool

As you should know by now, I am a big of polka dots.
And I love love LOVE polka dotted nails!

To cheer me up during this cold winter snap, I decided to add a little jazz to otherwise dull-looking greys.


I can be a real cheapie so instead of purchasing nail dotting tools and accessories, I just made my own.


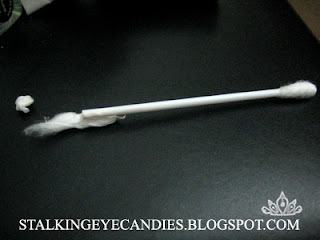
By using a cotton bud (or a Q-tip by others), I am able to create my own custom dotting tool. Just simply remove one end of a cotton bud. Tip: It's easier to remove when the cotton is wet.


Once it's clean, it should look like this.

Now, I painted my nails prior to removing the cotton... which is rather stupid since I had a good chance of ruining my freshly painted nails but I've got mad awesome skills so no problems there.


I usually use a base coat underneath my polish. I used Rimmel's Grey Matter, which I find very true to grey without a hint of blue tones. The brush is wide, making application a breeze. 

I used one generous coat as I plan to use a top coat.

Just dip the naked end of your cotton bud into a white/cream nail polish, making sure you have a small dollop of laquer. You can test the size of the dots by dotting onto a piece of paper.


Unfortunately, you will end up with some dots larger than others if you are not careful, but I actually like irregular sized.

Now, polka dots are evenly spaced so to make sure you get nicely distributed dots, always start with one in the middle of your nail.


The middle dot will act as your marker. Much like the 5 dots on the face of a dice, the middle dot is framed by four dots, one at each corner of the dice

I find this much easier than just randomly dotting on a nail. More often than not, five dots are sufficient but if your nails are long-ish, you can place a sixth dot at the edge of your nail.

You have to be very patient afterwards as dots tend to take a lot longer to dry since they're blobbed on.

Once they've dried, use a clear top coat to seal and protect them!


Have a good weekend everyone! 
Related Posts Plugin for WordPress, Blogger...